
GitLab CI/CD Pipeline Setup Guide: From Zero to Automated Deployment
Make sure your Friday deploy doesn't stretch to the whole weekend.

Why CI/CD Pipelines Matter
Remember manually building your app, SSHing into a server, uploading files, and crossing your fingers? CI/CD pipelines automate all of that.
CI/CD stands for Continuous Integration and Continuous Deployment. It’s a system that automatically tests, builds, and deploys your code every time you push changes. Instead of manual deployments taking 20 minutes and occasionally breaking things, pipelines do it consistently in 2 minutes while you grab coffee.
Zero downtime deployment means your users never see a loading spinner or error page during updates. Instead of replacing files while the site is running (causing brief outages), you build the new version separately and swap it in atomically - like changing a lightbulb while it’s still on.
Even after setting up pipelines many times, it still took me a full day to get this right. Here’s a streamlined guide to save you time.
What You’ll Build
A single automated pipeline that:
Creates semantic versions (v1.0.0, v1.1.0, etc.)
Builds your Quasar/Vue app
Deploys to production with zero downtime
One button press, fully automated
Step 1: Create .releaserc.json
Add semantic versioning to your project root:
{
  “branches”: [”master”],
  “plugins”: [
    “@semantic-release/commit-analyzer”,
    “@semantic-release/release-notes-generator”,
    “@semantic-release/changelog”,
    [”@semantic-release/npm”, { “npmPublish”: false }],
    “@semantic-release/gitlab”,
    [
      “@semantic-release/git”,
      {
        “assets”: [”CHANGELOG.md”, “package.json”],
        “message”: “chore(release): ${nextRelease.version} [skip ci]”
      }
    ]
  ]
}
Key point: [skip ci] prevents infinite pipeline loops.
Step 2: Setup GitLab CI/CD Variables
Go to Settings → CI/CD → Variables and add:
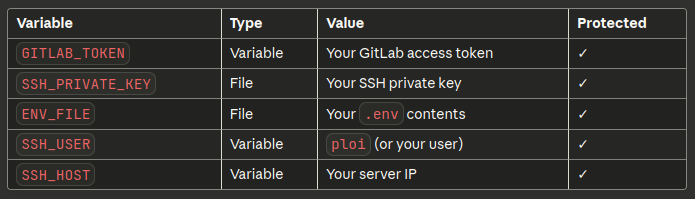
Pro tip: Protect your tags (v* pattern) in Settings → Repository → Protected Tags so protected variables work.
Step 3: Create .gitlab-ci.yml
workflow:
  rules:
    - if: $CI_COMMIT_BRANCH == “master”

stages:
  - release
  - build
  - deploy

variables:
  DEPLOY_PATH: “/home/ploi/your-domain.com”

# 1. Create version tag
release:
  stage: release
  image: node:20
  only:
    - master
  before_script:
    - git config user.email “ci@gitlab.com”
    - git config user.name “GitLab CI”
    - git remote set-url origin https://gitlab-ci-token:${GITLAB_TOKEN}@gitlab.com/your/repo.git
  script:
    - npm install -g semantic-release @semantic-release/gitlab @semantic-release/git
    - npx semantic-release
  when: manual

# 2. Build application
build:
  stage: build
  image: node:20
  only:
    - master
  needs: [release]
  artifacts:
    paths:
      - dist/spa/
    expire_in: 1 week
  before_script:
    - cp $ENV_FILE .env
  script:
    - npm install --legacy-peer-deps
    - npm install -g @quasar/cli
    - quasar build
    - git describe --tags > dist/spa/version.txt

# 3. Deploy to server
deploy:
  stage: deploy
  image: alpine:latest
  only:
    - master
  needs: [build]
  before_script:
    - apk add --no-cache openssh-client rsync
    - eval $(ssh-agent -s)
    - chmod 600 $SSH_PRIVATE_KEY
    - ssh-add $SSH_PRIVATE_KEY
    - mkdir -p ~/.ssh
    - ssh-keyscan -H $SSH_HOST >> ~/.ssh/known_hosts
  script:
    - VERSION=$(git describe --tags)
    - ssh $SSH_USER@$SSH_HOST “mkdir -p $DEPLOY_PATH/releases/$VERSION”
    - rsync -avz --delete dist/spa/ $SSH_USER@$SSH_HOST:$DEPLOY_PATH/releases/$VERSION/
    - ssh $SSH_USER@$SSH_HOST “cd $DEPLOY_PATH && ln -nsf releases/$VERSION public”
    - ssh $SSH_USER@$SSH_HOST “cd $DEPLOY_PATH/releases && ls -t | tail -n +6 | xargs rm -rf”
  environment:
    name: production
Step 4: Server Setup (One-Time)
SSH into your server and prepare the directory:
cd /home/ploi/your-domain.com
rm -rf public
mkdir -p releases
Update nginx config to point to /home/ploi/your-domain.com/public with:
location / {
    try_files $uri $uri/ /index.html;
}
Step 5: Commit Convention
Use semantic commit messages to trigger releases:
feat: add feature→ bumps minor version (1.0.0 → 1.1.0)fix: bug fix→ bumps patch version (1.0.0 → 1.0.1)feat!: breaking change→ bumps major version (1.0.0 → 2.0.0)
How to Deploy
Make commits with proper prefixes (
feat:,fix:)Push to master
Go to CI/CD → Pipelines
Click ▶️ on the
releasejobWatch it automatically build and deploy
That’s it! One pipeline, zero manual steps after the initial trigger.
Why This Works
✅ Single pipeline - uses needs: to chain stages
✅ Automatic versioning - semantic-release handles it
✅ Zero downtime - symlink swap is atomic
✅ Easy rollbacks - keeps last 5 releases
✅ No duplicate pipelines - [skip ci] in release commits
The setup takes time, but once it’s running, deployments become effortless.
Bonus: The Friday Deployment Safety Net
Ever deployed on a Friday and immediately regretted it? Want to add a one-click rollback pipeline for those “oh no” moments?
Let me know in the comments if you’d like a follow-up guide on adding a rollback stage - perfect for when you deploy right before the weekend and realize you probably shouldn’t have. 😅
It’s just one more stage that lets you instantly revert to any previous release with a single button click. Because we all make questionable deployment decisions sometimes.
You should try and add https://github.com/SvitDolenc/AICodeReviewer to the CI/CD. It would be a really good addition to this pipeline.